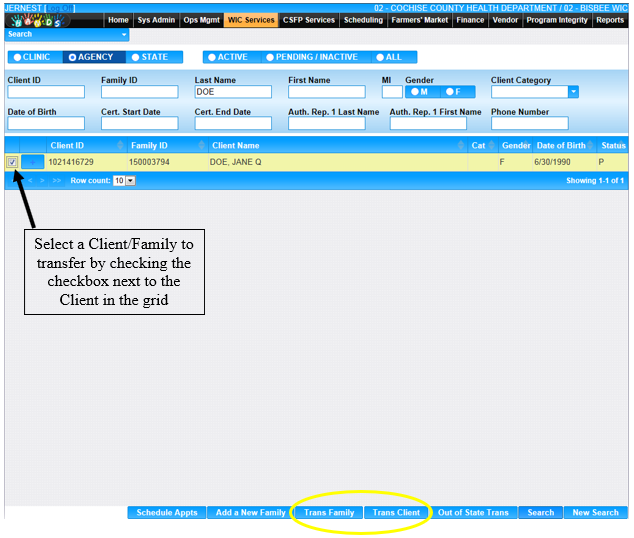

Narrative: The purpose of this page is to transfer Clients from Clinic to Clinic. The user can transfer an entire family or an individual Client. The user will select either a Family or Client to transfer by searching and selecting them from the Client/Family search page. The user must be logged into the Clinic to which the client should be transferred, then search in Agency or State options to return Clients that are not in the logged in Clinic. For example, if the user wants to transfer a Client at 02 Cochise/01 Douglas to 07 Maricopa/01 Downtown, then the user must be logged into 07 Maricopa/01 Downtown Clinic and search using State criteria to be able to select and transfer the Client that is in the 02 Cochise/01 Douglas Clinic. The user will then use the Trans Family and Trans Client buttons at the bottom of the page. Through the in-state transfer process the user can also move Client’s from family to family within their own Clinic.
Navigation Path: WIC Services tab | Client/Family Search

Module 7: Figure 1: In-State Transfer
NOTE: The user only needs to select one Client within the desired Family in order to transfer the entire family.
Buttons:
Calculations: None
Background Processes:
1) When the user selects a Family to transfer and presses the Trans Family button the transfer Family modal will open.

Module 7: Figure 2: Transfer Family Modal
Buttons:
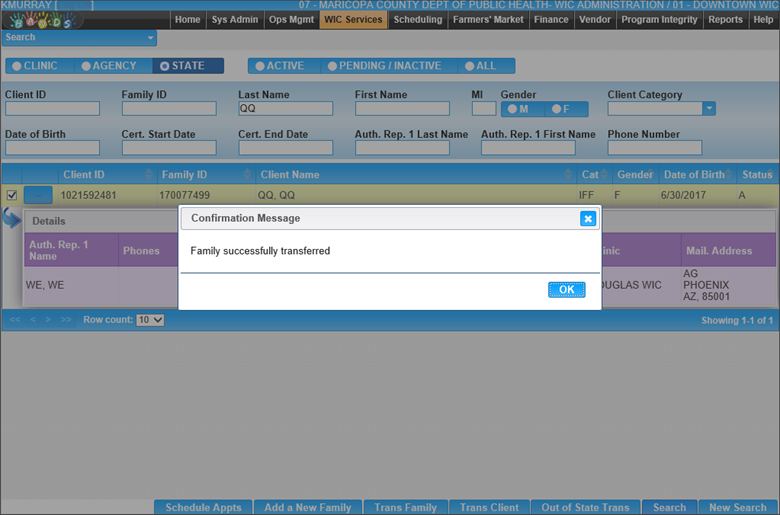
• Yes – Press this button to transfer the selected family to the Clinic the user is logged into. The user will be brought to the family information page for the transferred family.

Module 7: Figure 3: Transferred Family Successfully

Module 7: Figure 4: Transferred Family Populates the Family Information Page
• No – Press this button to close the transfer Family modal and stop the transfer process without anything being done to the Family’s record. The user will be brought back to the Client/Family search page.
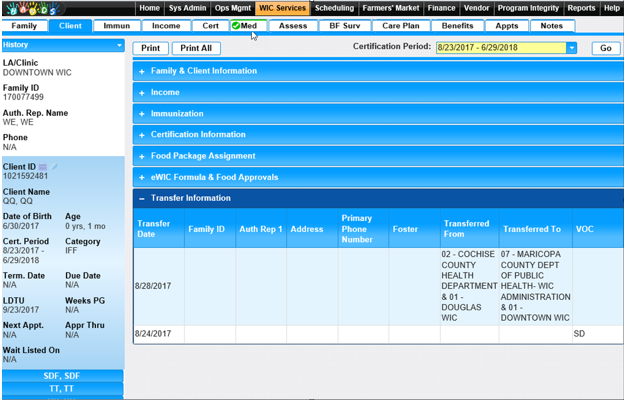
NOTE: When a transfer occurs the transfer, information is populated in the transfer section on the Client’s history page. For more information, see the History section of this document.

Module 7: Figure 5: Transfer Information on the Client’s History Page
2) When the user selects a Client to transfer and presses the Trans Client button the transfer Client modal is displayed to the user.

Module 7: Figure 6: Transfer Client Modal
Buttons:
• New Family – Press this button to transfer the selected Client to a new family. The user will be brought to the Add a New Family page. The new family will have the transferred Client’s record linked to it and will be within the users logged in Clinic. For more information on adding new families to the system, see the Add a New Family section of this document.
• Existing Family – Press this button to transfer the Client to an existing Family in the system. The user will be brought to the Existing Family Search page.

Module 7: Figure 7: Existing Family Search page
Fields:
▪ Family ID – A unique, system generated identification number for the Family. This field is optional.
▪ Authorized Rep. Last Name - The last name of the first authorized representative for the Family. This field is optional.
▪ Authorized Rep. First Name - The first name of the first authorized representative for the Family. This field is optional.
NOTE: The user can only search for Families that are within their logged in Clinic.
Buttons:
▪ Transfer Client – Press this button after selecting the desired Family from the search results grid to open the transfer Client confirmation modal.

Buttons:
➢ Transfer Client – Press this button to transfer the Client into the selected Family. The user will be brought to the Family information page for the transferred Client’s new Family.
➢ Cancel – Press this button to stop the transfer Client process and return to the existing Family search page without the selected Client being transferred.
NOTE: When a transfer occurs the transfer, information is populated in the transfer section on the Client’s history page. For more information, see the History section of this document.
▪ Search – Press this button to execute query of search criteria entered.
▪ New Search – Press this button to clear search criteria and results.
▪ Back to List – Press this button to stop the Client transfer process and return to the Client/Family search page. The selected Client will not be transferred.
• Cancel – Press this button to close the transfer Client modal and stop the transfer process without anything being done to the Client’s record. The user will be brought back to the Client/Family search page.
Background Processes:
1) When a single Client is transferred to a new or existing family the following process occur for both the transferred Client’s income and the Client’s previous Family’s income.
a. Adjunct participation for the transferred Client will be moved with the Client.
b. The transferred Client’s income will be deleted from the Client’s previous Family’s current income and will have no impact on the new family. A record will be placed in the history of the Client’s previous Family that will display the income for the transferred Client, so that it is not lost and there is a record what income the transferred Client was certified with.
c. The system will not require the transferred Client to have income documented again until a new certification is needed.
d. If the transferred Client is a foster child, a new income history record will be created with the same income documentation and income date as the most recent income and will have a Family size of 1.